Blog

  • Choosing and Building the Perfect Retaining Wall

    Choosing and Building the Perfect Retaining Wall

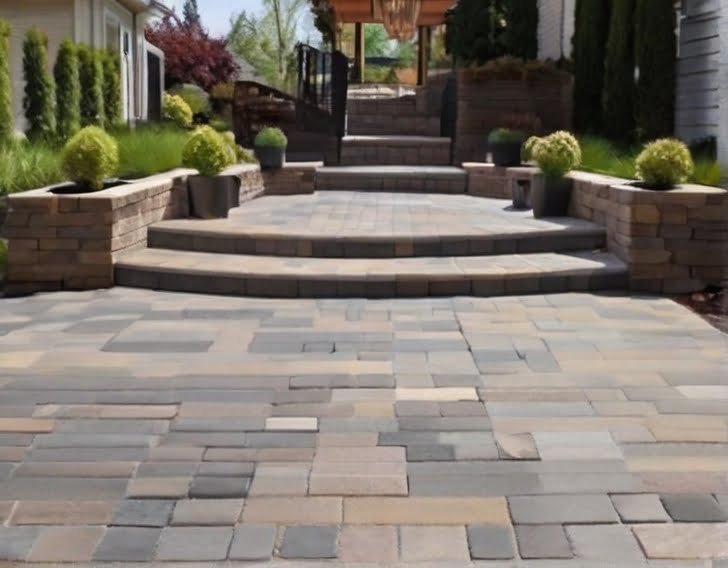
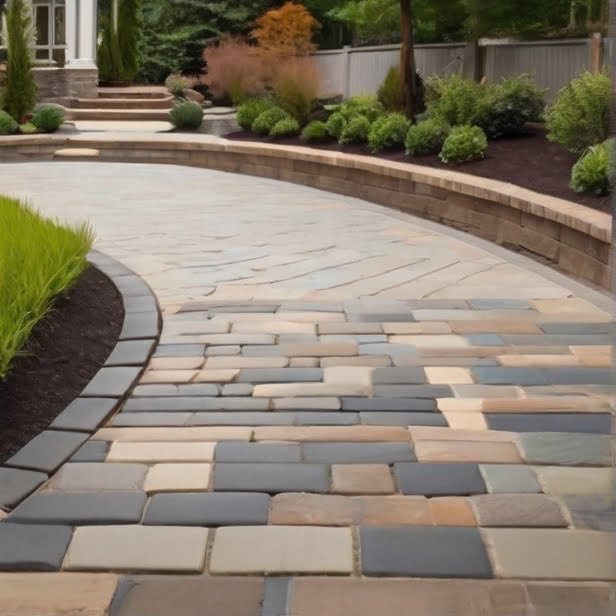
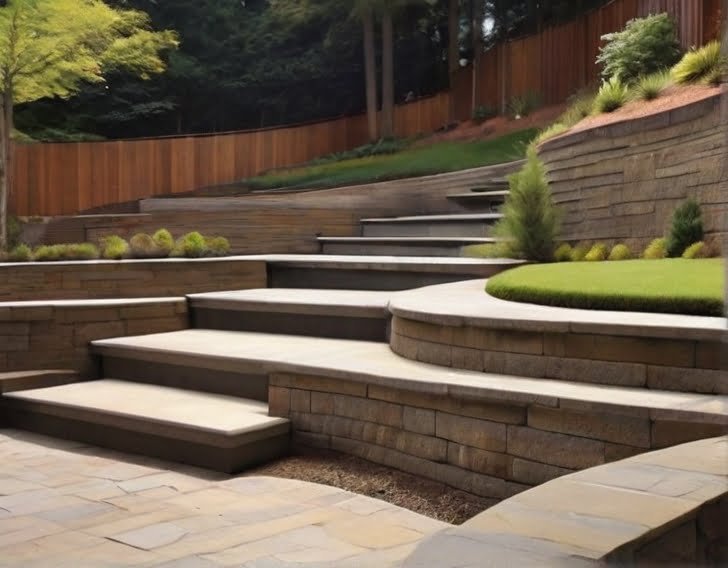
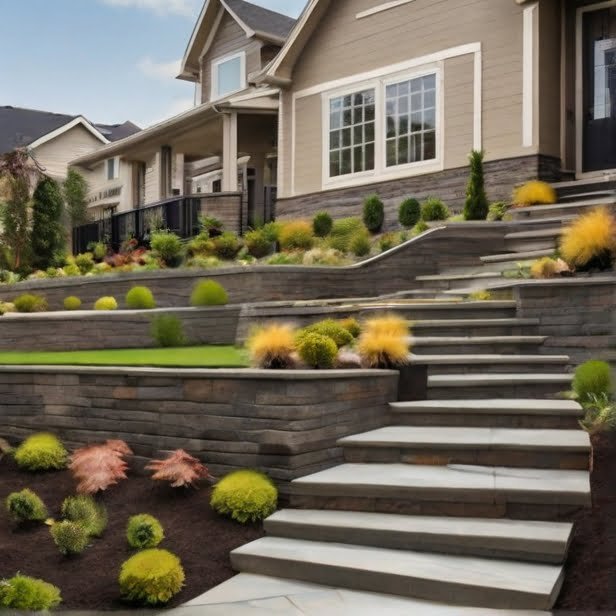
    The construction and remodeling industry offer a plethora of options for enhancing both the aesthetics and functionality of outdoor spaces. Retaining walls, in particular, play a crucial role in providing support, preventing erosion, and adding a distinctive touch to landscaping projects. In this comprehensive guide, we’ll explore the process of building a Retaining Wall, delve into the four main types, discuss the best choices, explore the strongest options, and examine the materials commonly used behind these walls.

    Understanding the Retaining Wall Construction Process

    Building a retaining wall requires careful planning and execution. The process involves several key steps to ensure stability and longevity. Here’s a step-by-step guide to constructing a retaining wall:

    Site Preparation:

    Before commencing the construction, assess the site and determine the layout of the retaining wall. Clear the area of any debris, vegetation, or obstacles that might hinder the construction process.

    Excavation:

    Dig a trench where the base of the retaining wall will be located. The depth and width of the trench depend on the height and type of wall you’re constructing. Ensure a firm and level base.

    Foundation:

    Lay a sturdy foundation using gravel or crushed stone. This foundation provides stability and drainage, crucial for the longevity of the retaining wall.

    First Course Placement:

    Lay the first course of retaining wall blocks or stones in the trench. Ensure level placement, using a level and rubber mallet to adjust as needed.

    Backfilling:

    Fill the space behind the first course with crushed stone or gravel. This allows for proper drainage and prevents water buildup that can compromise the wall’s integrity.

    Additional Courses:

    Continue stacking courses of blocks or stones, ensuring each layer is level and securely placed. Use adhesive or interlocking mechanisms to enhance stability.

    Compaction:

    Compact the backfilled material regularly as you build the wall to prevent settling. This is a crucial step to maintain the structural integrity of the retaining wall.

    Drainage Considerations:

    Incorporate drainage elements, such as perforated pipes, gravel-filled trenches, or weep holes in the wall, to redirect water away from the structure.

    Cap Installation:

    Finish the wall by installing caps on the top course. Caps provide a finished look and help protect the wall from the elements.

    By following these steps, you can create a durable and visually appealing retaining wall that enhances the overall design of your outdoor space.

    Retaining Wall

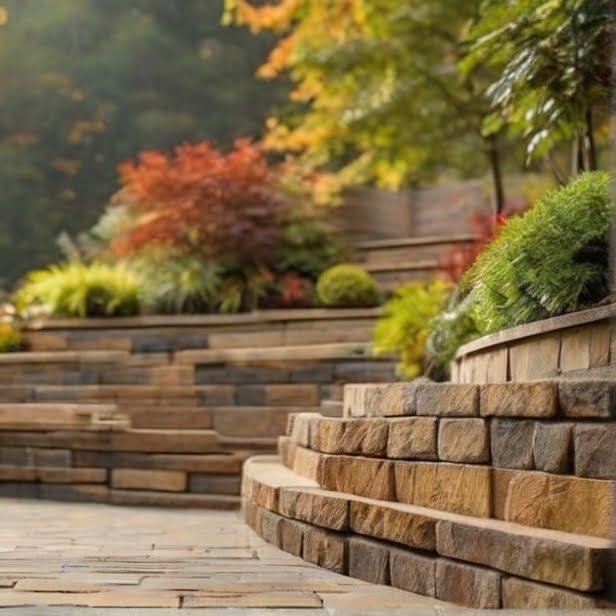
    Exploring the Four Types of Retaining Walls

    Retaining walls come in various types, each catering to specific needs and preferences. Here are the four main types:

    Gravity Retaining Walls:

    These walls rely on their weight and mass to resist pressure from the soil behind them. They are suitable for low to medium-height applications and are known for their simplicity and cost-effectiveness.

    Cantilever Retaining Walls:

    Cantilever walls use a concrete slab foundation and an extended arm, or “stem,” that reaches back into the retained soil. They are suitable for moderate to high walls and offer stability and strength.

    Sheet Pile Retaining Walls:

    Commonly used in waterfront or marine environments, sheet pile walls consist of interlocking steel, vinyl, or wood panels driven into the ground. They are effective in preventing soil erosion and are often used for temporary structures.

    Anchored Retaining Walls:

    Anchored walls incorporate additional support through the use of cables or rods anchored into the soil or rock behind the wall. This type is ideal for taller walls and provides enhanced stability.

    Determining the Best Type of Retaining Wall

    The choice of the best retaining wall type depends on various factors, including the specific requirements of the project, soil conditions, and budget constraints. While gravity walls are suitable for shorter applications, cantilever walls offer a balance of strength and versatility. Sheet pile walls are excellent for waterfront locations, and anchored walls provide the necessary support for taller structures.

    To determine the best type for your project, consider factors such as the wall’s height, the soil’s characteristics, drainage requirements, and aesthetic preferences. Consulting with a professional in the construction and remodeling industry can provide valuable insights tailored to your specific needs.

    Unveiling the Strongest Retaining Wall Options

    Strength is a critical factor when choosing a retaining wall, especially for applications where the wall needs to withstand significant pressure. Among the various types, anchored retaining walls stand out as the strongest option. The incorporation of cables or rods anchored into the soil or rock behind the wall provides additional support, making them suitable for taller structures and challenging soil conditions.

    When strength is a primary concern, consulting with an experienced contractor or engineer is essential. They can assess the specific requirements of your project and recommend the most robust retaining wall solution tailored to your needs.

    Retaining Wall

    Materials Used Behind Retaining Walls

    The material used behind retaining walls, known as backfill, plays a crucial role in ensuring proper drainage and stability. Common materials include:

    Crushed Stone or Gravel:

    These materials provide excellent drainage and help prevent water buildup behind the retaining wall.

    Drainage Pipes:

    Perforated drainage pipes are often used to direct water away from the wall, preventing pressure buildup.

    Filter Fabric:

    Placed between the backfill material and the soil, filter fabric prevents soil particles from clogging drainage elements.

    Geogrid:

    Geogrid is a reinforcing material that enhances the stability of the soil behind the retaining wall, reducing the risk of erosion.

    Choosing the right backfill material depends on the specific requirements of your project, soil conditions, and drainage needs. Consulting with a construction professional can help you make informed decisions that contribute to the longevity and effectiveness of your retaining wall.

    Conclusion

    In conclusion, retaining walls play a crucial role in the construction and remodeling industry, offering both functional and aesthetic benefits. Understanding the construction process, exploring the different types, determining the best choice, considering strength options, and selecting appropriate backfill materials are key aspects of successfully incorporating retaining walls into your outdoor spaces.

    For more detailed information and professional assistance in retaining wall construction, visit BuildsMore Construction and Remodeling. Their expertise and commitment to quality make them a reliable partner in bringing your retaining wall visions to life.

    By following these guidelines and seeking expert advice, you can create a retaining wall that not only serves its practical purpose but also enhances the overall beauty and functionality of your outdoor environment.

  • Reshaping Interiors and Exteriors through Artistry

    Reshaping Interiors and Exteriors through Artistry

    In the realm of construction and remodeling, the finishing touches can make all the difference. Among the various elements that contribute to the aesthetic appeal of a structure, painting stands out as a transformative force, both for the exterior and interior spaces. Whether you’re looking to enhance your curb appeal or create a cozy ambiance indoors, choosing the right paint is key. In this comprehensive guide, we’ll explore the best practices, considerations, and expert insights into exterior and Interior Painting.

    Preparation Tips for Painting Success

    Before diving into a painting project, proper preparation is key. Cleansing the exterior surfaces and repairing any damages ensures a smooth application and enhances paint adherence. For interiors, move or cover furniture, protect floors, and fill any holes or cracks in the walls for a flawless finish. Adequate preparation sets the stage for a successful painting venture.

    Trends in Exterior and Interior Paint Colors

    Stay up-to-date with the latest trends in exterior and interior paint colors. While timeless classics endure, staying abreast of current trends can add a contemporary touch to your home. From muted pastels to bold accent walls, understanding what’s in vogue can inspire your color choices and keep your space looking modern and stylish.

    Exterior Painting: Choosing the Perfect Palette

    1. Which Exterior Paint is Best?

    Selecting the best exterior paint is a crucial decision for homeowners and builders alike. The ideal paint should not only provide a stunning finish but also withstand the harsh elements. BuildsMore , a leading name in construction and remodeling, recommends high-quality exterior paints that are weather-resistant and durable. Brands like Example Paint offer a range of options tailored to different climates, ensuring longevity and vibrancy.

    2. Is Exterior Paint Waterproof?

    Absolutely! The best exterior paints come with waterproofing properties, forming a protective barrier against rain, snow, and humidity. This not only preserves the integrity of your walls but also prevents moisture-related issues such as mold and mildew. Explore the waterproof features of top-notch exterior paints to keep your investment looking pristine for years to come.

    3. Which Color Suits Exterior Walls?

    Choosing the right color for your Exterior Walls is a personal and aesthetic decision. However, certain colors are known to complement architectural styles and environmental factors. Earthy tones like beige and taupe offer a timeless appeal, while bold choices like navy blue or forest green can make a statement. Consider the surroundings, architectural style, and your personal preferences when selecting the perfect hue.

    Interior Painting: Elevating Spaces with Color

    4. What is Best for Interior Painting?

    When it comes to interior painting, the options are vast. Consider the function of the space, lighting conditions, and your desired atmosphere. BuildsMore recommends premium interior paints that provide excellent coverage and durability. Brands like Interior Harmony offer a spectrum of colors and finishes to cater to diverse preferences.

    Exterior Painting

    5. How Many Layers of Paint?

    The number of layers depends on the condition of the existing surface and the desired finish. In most cases, two coats of paint are sufficient for a smooth, even look. However, surfaces with imperfections or bold color changes may require an additional coat. Applying the right number of layers ensures a flawless and long-lasting finish that stands the test of time.

    6. Can I Use Acrylic Paint for Interior?

    Certainly! Acrylic paint is a popular choice for interior spaces. It dries quickly, emits fewer odors than oil-based alternatives, and is easy to clean. BuildsMore GC recommends high-quality acrylic paints for interior applications, providing a versatile and cost-effective solution for achieving beautiful and durable results.

    Conclusion: Elevate Your Space with Expert Painting

    In the world of construction and Remodeling, painting is an art form that goes beyond mere aesthetics. It’s a crucial element that protects and enhances the surfaces, both inside and outside your home. By choosing the right paints and following expert recommendations, you can transform your living spaces into vibrant, inviting havens that reflect your style and withstand the test of time.

    Whether you’re embarking on a new construction project or giving your existing space a facelift, consider the insights shared here to make informed decisions about exterior and interior painting. Connect with BuildsMore for expert advice and high-quality painting solutions tailored to your unique needs.

  • A Complete Manual for Installing Pavers

    A Complete Manual for Installing Pavers

    In the realm of construction and remodeling, the allure of outdoor spaces has become increasingly important. One popular and versatile option for upgrading your exteriors is the installation of pavers. Whether you’re looking to revamp a patio, driveway, or walkway, pavers offer a durable and aesthetically pleasing solution. In this comprehensive guide, we’ll delve into the intricacies of Pavers Installation, addressing common questions and providing valuable insights.

    Are Pavers Installed Over Concrete?

    A common query among those considering pavers installation is whether they can be laid over concrete surfaces. The answer largely depends on the specific project requirements and conditions. While pavers can be installed over existing concrete in some cases, it’s crucial to assess factors such as the condition of the concrete and the type of pavers being used. Learn more about pavers installation and how it can be tailored to your unique needs.

    Preparing the Ground for Pavers

    Proper preparation of the ground is paramount for a successful pavers installation. We’ll walk you through a step-by-step guide on how to prepare the ground, ensuring a stable foundation for your pavers. From excavation to compaction, understanding each phase of the process is essential for the longevity of your outdoor space.

    Materials Used in Pavers Installation

    The materials used in the installation process significantly contribute to the durability and performance of your pavers. From the pavers themselves to the base and jointing materials, we’ll explore the key components that make up a robust pavers installation. Learn how choosing the right materials can enhance both the aesthetic appeal and longevity of your outdoor project.

    Laying Pavers Directly on Soil

    One of the common queries that arise during the planning phase is whether pavers can be laid directly on soil. While it’s possible in certain scenarios, understanding the implications and potential challenges is crucial. We’ll provide insights into when laying pavers on soil is feasible and discuss alternative solutions for varying soil conditions.

    Choosing the Right Sand for Pavers Installation

    The type of sand used in the jointing process plays a pivotal role in stabilizing the pavers and preventing weed growth. We’ll guide you through the options, helping you make an informed decision based on your specific project requirements. Discover the importance of the correct sand for achieving a polished and enduring pavers installation.

    Conclusion: Elevate Your Outdoor Living Experience

    In conclusion, a well-executed pavers installation can transform your outdoor space, adding both value and visual appeal to your property. By addressing common questions and providing insights into the intricacies of the process, we hope this guide has equipped you with the knowledge needed to embark on your pavers installation journey. For personalized guidance and professional expertise, contact us at BuildsMore Construction, where we specialize in turning outdoor visions into reality.

    Maintaining Your Pavers Installation: Tips for Longevity

    Now that your pavers are beautifully laid, it’s essential to understand how to maintain them for long-lasting appeal. We’ll provide practical tips on cleaning, sealing, and addressing common issues to ensure your pavers stand the test of time. Explore the best practices for preserving the beauty and functionality of your outdoor space.

    Incorporating Design Elements into Your Pavers Project

    Pavers installation goes beyond functionality; it’s an opportunity to infuse your personal style into your outdoor space. From choosing the right paver patterns to exploring color options, we’ll guide you through the creative aspects of the installation process. Learn how to harmonize your pavers project with your overall design vision for a cohesive and inviting outdoor environment.

    Budgeting for Pavers Installation: What to Consider

    Understanding the cost factors associated with pavers installation is crucial for effective budgeting. We’ll break down the various elements that contribute to the overall cost, allowing you to make informed decisions based on your financial parameters. From material costs to labor expenses, gain insights into creating a budget that aligns with your vision.

    DIY vs. Professional Installation: Pros and Cons

    Contemplating whether to embark on a DIY pavers installation or hire professionals? We’ll explore the advantages and drawbacks of each option, helping you make an informed decision based on your skills, timeframe, and project complexity. Whether you’re a seasoned DIY enthusiast or prefer the expertise of professionals, this section will guide you towards the best choice for your needs.

    Case Studies: Inspiring Pavers Installation Projects

    Get inspired by real-life examples of stunning pavers installation projects. We’ll showcase case studies that highlight different styles, materials, and applications, providing a visual journey through the diverse possibilities of pavers. From contemporary designs to classic aesthetics, discover how others have transformed their outdoor spaces with creative pavers installations.

    Environmental Considerations in Pavers Installation

    As sustainability becomes a focal point in construction and remodeling, we’ll explore the environmental aspects of pavers installation. Learn about eco-friendly paver options, permeable pavers, and how your installation choices can contribute to a greener outdoor environment. Discover ways to minimize the ecological footprint of your project while enjoying the benefits of a beautifully paved space.

    Conclusion: Pavers Installation Unleashed

    In wrapping up this comprehensive guide, we’ve navigated through the intricacies of pavers installation – from the foundational aspects to design choices, maintenance tips, and environmental considerations. Whether you’re a homeowner embarking on a DIY project or seeking professional assistance, the journey of pavers installation promises an enhanced outdoor living experience. For expert guidance and execution, reach out to BuildsMore Construction Company New Jersey to turn your vision into reality.

  • Flooring Services and Railings Installation Guide

    Flooring Services and Railings Installation Guide

    In the dynamic realm of construction and remodeling, the demand for quality flooring services and expert railings installation remains consistently high. Whether you are considering a Home Renovation Company or commercial project, understanding the intricacies of these services is crucial. In this comprehensive guide, we will delve into the questions surrounding the demand for flooring, the potential earnings, cost-effectiveness of DIY flooring, stair railings installation, and the factors influencing the cost of railing installation.

    Is Flooring in Demand?

    Flooring is a foundational element in any construction or remodeling project, and its demand is a testament to its significance. From homeowners looking to revamp their living spaces to businesses seeking a modern aesthetic, the need for quality flooring services is ever-present. Factors such as wear and tear, changing design trends, and the desire for energy-efficient solutions contribute to the sustained demand for flooring services.

    How Much Money Can You Make Flooring?

    The potential earnings in the flooring industry can vary based on factors like expertise, location, and the scale of projects undertaken. Skilled flooring professionals often find lucrative opportunities, especially in areas with a high demand for remodeling and construction services. Establishing a reputation for delivering quality work, offering diverse flooring options, and providing excellent customer service can significantly impact your earning potential.

    Is It Cheaper to Make Your Own Flooring?

    While the idea of crafting your own flooring may seem appealing, the cost-effectiveness depends on various factors. DIY flooring projects can save money on labor costs, but it’s crucial to consider the materials, tools, and time involved. Professional flooring Services often have access to bulk materials at discounted rates and possess the expertise to ensure a durable and aesthetically pleasing result. Before embarking on a DIY flooring project, carefully weigh the costs and potential challenges.

    How Do You Install Stair Railings?

    Installing stair railings is a meticulous process that requires precision and expertise. Here is a step-by-step guide to assist you:

    Measure and Plan:

    Accurate measurements are crucial for a successful railing installation. Plan the placement and height of the railing to ensure it complies with safety standards.

    Gather Materials:

    Acquire the necessary materials, including the railing system, brackets, screws, and a level. Opt for high-quality materials to ensure durability.

    Prepare the Surface:

    Ensure the surface is clean and free of any obstacles. If installing on concrete steps, use a hammer drill to create anchor points for the railing.

    Install Brackets:

    Secure the brackets to the designated points, ensuring they are level and properly aligned. This forms the foundation for the railing.

    Attach the Railing:

    With the brackets in place, attach the railing securely. Double-check the alignment and make any necessary adjustments.

    Secure and Test:

    Use screws to firmly secure the railing to the brackets. Once installed, test the railing’s sturdiness to ensure it meets safety standards.

    How Much Does It Cost to Install a Rail?

    The cost of railing installation can vary based on factors such as material, design complexity, and labor. On average, you can expect to invest anywhere from $50 to $120 per linear foot for professionally installed railings. Intricate designs, premium materials, and custom features may increase the overall cost. It’s advisable to obtain multiple quotes from reputable contractors to ensure a fair and competitive price.

    How Do You Install a Railing on Concrete Steps?

    Installing a railing on concrete steps involves additional considerations. Follow these steps for a successful installation:

    Prepare the Concrete:

    Clean the concrete surface thoroughly, removing any debris or loose particles. Use a degreaser if necessary.

    Mark Anchor Points:

    Use a pencil to mark the precise locations for the railing anchors. Ensure they align with the intended placement of the railing.

    Drill Anchor Holes:

    Utilize a hammer drill with a masonry bit to drill anchor holes into the concrete. The depth of the holes should accommodate the anchor screws.

    Insert Anchors:

    Place the anchor sleeves into the drilled holes. Hammer them in until they are flush with the surface.

    Attach Brackets:

    Secure the railing brackets to the anchor sleeves, ensuring they are level and securely attached.

    Install the Railing:

    With the brackets in place, attach the railing according to the manufacturer’s instructions. Check for alignment and stability.

    Secure and Test:

    Use appropriate screws to secure the railing to the brackets. Perform a thorough test to confirm the railing’s stability and safety.

    By following these steps, you can achieve a secure and aesthetically pleasing railing installation on concrete steps.

    Conclusion

    In conclusion, flooring services and railings installation play pivotal roles in enhancing the functionality and aesthetics of any space. Whether you are a homeowner exploring flooring options or a contractor looking to provide top-notch services, understanding the demand, potential earnings, and installation processes is essential. For expert flooring services and railings installation in, Buildsmore is your trusted partner. Visit our website Buildsmore to explore our offerings and embark on a journey to transform your space.

  • Exploring Concrete Solutions for Construction and Renovation Projects.

    Exploring Concrete Solutions for Construction and Renovation Projects.

    In the expansive domain of construction and remodeling, the role of a concrete worker in New Jersey is paramount. These skilled professionals from a Construction Company in New Jersey form the backbone of projects, shaping the foundations and structures that stand the test of time. In this comprehensive guide, we’ll delve into the intricacies of concrete work specific to New Jersey, exploring its types, strengths, and the basics that make it a cornerstone in the construction industry within the state.

    What is a Concrete Worker?

    A concrete worker, often referred to as a concrete finisher or mason, is a skilled tradesperson specializing in working with concrete. Their expertise lies in the precise application and finishing of concrete to create durable and aesthetically pleasing structures. These professionals play a crucial role in various construction projects, from residential buildings to commercial complexes.

    Examples of Concrete Work

    Concrete work encompasses a wide range of applications, each serving a unique purpose in construction and remodeling. Some common examples include:

    1. Foundations:

    Concrete is the go-to material for building strong and stable foundations. Whether for a house, a bridge, or a skyscraper, a well-constructed concrete foundation provides the necessary support for the entire structure.

    2. Sidewalks and Driveways:

    The smooth, durable surface of concrete makes it ideal for sidewalks and driveways. Concrete sidewalks not only enhance the curb appeal but also offer longevity and low maintenance.

    3. Retaining Walls:

    In landscaping and hilly terrains, concrete is often used to create Retaining Walls. These walls prevent soil erosion and create level surfaces for gardens or outdoor spaces.

    4. Concrete Floors:

    From residential homes to industrial spaces, concrete floors are a popular choice. Polished and stained concrete floors not only offer durability but also a sleek, modern aesthetic.

    5. Stamped Concrete Patios:

    For outdoor living spaces, stamped concrete patios provide a customizable and visually appealing option. The concrete can be stamped to mimic the look of stone, brick, or other materials.

    The 3 Types of Concrete Details

    Concrete comes in various forms, each tailored to specific needs. The three primary types of concrete details are:

    1. Ready-Mix Concrete:

    This is a pre-mixed concrete that is delivered to the construction site in a plastic or unhardened state. Ready-mix concrete is convenient, as it eliminates the need for on-site mixing and ensures consistent quality.

    2. High-Strength Concrete:

    As the name suggests, high-strength concrete is designed to withstand heavy loads and harsh conditions. It is commonly used in infrastructure projects, such as bridges and high-rise buildings.

    3. Lightweight Concrete:

    Ideal for projects where weight is a concern, lightweight concrete is made using lightweight aggregates. It offers the structural benefits of concrete while reducing the overall load.

    The Strongest Type of Concrete

    When it comes to strength, one particular type stands out – High-Performance Concrete (HPC). HPC is engineered to have exceptional compressive strength, making it the go-to choice for structures that require superior durability. Its composition often includes advanced admixtures, fibers, and a meticulous mix design, ensuring unparalleled strength.

    Basic Concrete Work Demystified

    Understanding the basics of concrete work is crucial for anyone involved in construction or remodeling projects. The key steps in basic concrete work include:

    1. Site Preparation:

    Before concrete is poured, the site must be properly prepared. This involves clearing the area, setting up formwork, and ensuring a level surface.

    2. Mixing the Concrete:

    The right mix of concrete is essential for a project’s success. This includes the correct proportions of cement, aggregates, and water. Ready-mix concrete can simplify this process.

    3. Pouring and Leveling:

    Once mixed, the concrete is poured into the formwork. Skilled concrete workers ensure an even distribution and use tools to level the surface.

    4. Finishing:

    Achieving a smooth and polished finish is an art in itself. Concrete finishers use trowels and other tools to create the desired texture and appearance.

    5. Curing:

    Curing is the process of allowing the concrete to harden and gain strength. Proper curing is crucial for the long-term durability of the structure.

    Conclusion

    In conclusion, the world of Concrete Services is diverse and essential in the construction and remodeling industry. From the skilled hands of concrete workers to the various types of concrete details, understanding these aspects is pivotal for successful and enduring projects.

    For reliable concrete services in your construction endeavors, consider BuildsMore Construction. With a commitment to quality and expertise, they stand as a trusted partner in bringing your concrete visions to life.

  • A Comprehensive Guide to Kitchen Renovation and Bathroom Remodeling

    A Comprehensive Guide to Kitchen Renovation and Bathroom Remodeling

    Is it worth renovating my kitchen?

    Renovating your kitchen is not just about updating its aesthetics; it’s an investment that can significantly enhance the overall value of your home. A well-designed kitchen not only adds functionality but also becomes the heart of your living space. The return on investment (ROI) for Kitchen Renovations is often high, making it a worthwhile venture.

    When contemplating a kitchen renovation, consider the current state of your kitchen and your lifestyle needs. Modern kitchens are more than just places to prepare meals; they are multifunctional spaces for family gatherings, entertaining guests, and even working from home. Evaluate your budget, and if feasible, investing in a kitchen renovation can bring both immediate joy and long-term financial benefits.

    How can I renovate my kitchen cheaply?

    Renovating a kitchen on a budget doesn’t mean compromising on style or functionality. Here are some cost-effective tips to achieve a stunning kitchen makeover without breaking the bank:

    1. Paint it Right: A fresh coat of paint can instantly breathe new life into your kitchen. Choose a color scheme that complements your taste and existing elements.
    2. Update Cabinet Hardware: Swapping out old cabinet handles and knobs for new, stylish ones can make a noticeable difference. It’s a small change that goes a long way.
    3. Revamp Lighting: Install affordable yet stylish lighting fixtures. Pendant lights over the kitchen island or under-cabinet lighting can add a touch of sophistication.
    4. DIY Backsplash: Consider a peel-and-stick backsplash. It’s a cost-effective and easy-to-install option that can instantly elevate the look of your kitchen.
    5. Open Shelving: Remove cabinet doors and embrace open shelving. It not only gives a modern touch but also allows you to display your favorite kitchen items.

    Remember, creativity and strategic choices can make a big impact on your kitchen’s appearance without a hefty price tag.

    How can I make my kitchen look nice?

    Making your kitchen look nice involves a combination of design, functionality, and personal style. Here are some tips to achieve a visually appealing kitchen:

    1. Choose a Timeless Design: Opt for a design that won’t go out of style quickly. Classic choices like shaker cabinets and neutral color palettes are enduring and versatile.
    2. Invest in Quality Materials: Quality materials not only enhance aesthetics but also ensure durability. Consider durable countertops, high-quality flooring, and reliable appliances.
    3. Balance Colors: Create a harmonious color scheme by balancing contrasting colors. This could involve pairing light cabinets with a bold backsplash or vice versa.
    4. Integrate Smart Storage Solutions: A clutter-free kitchen looks more spacious and inviting. Invest in smart storage solutions like pull-out pantry shelves and hidden trash bins.

    Upgrade Appliances: Modern, energy-efficient appliances not only contribute to a sleek look but also enhance functionality. Stainless steel appliances, for example, offer a contemporary and timeless aesthetic.

    How much does it cost to remodel a small bathroom?

    The cost of remodeling a small bathroom can vary widely based on factors such as the scope of the project, materials used, and your location. On average, a small bathroom remodel for Buildsmore can cost anywhere from $5,000 to $15,000 or more.

    Here’s a breakdown of potential costs:

    1. Fixtures and Fittings: New faucets, showerheads, and toilets can range from $100 to $1,000 or more, depending on the brand and features.
    2. Flooring: Tile, vinyl, or laminate flooring choices can affect costs. Budget between $3 and $10 per square foot for materials.
    3. Cabinetry and Storage: Custom or pre-made cabinets vary in price. Expect to pay between $1,000 and $5,000 for quality cabinetry.
    4. Labor Costs: Labor costs can comprise a significant portion of your budget. On average, you might spend between $50 and $75 per hour for a professional contractor.
    5. Additional Features: If you’re adding features like a bathtub or a new shower enclosure, budget accordingly. Specialty items can significantly impact costs.

    Keep in mind that these are rough estimates, and it’s essential to get detailed quotes from contractors based on your specific requirements.

    What is the most expensive part of a bathroom remodel?

    While various elements contribute to the cost of a bathroom remodel, one of the most expensive parts is often the labor and installation costs. Professional labor is crucial for tasks such as plumbing, electrical work, and intricate tile installation.

    Here’s a breakdown of potential expenses:

    1. Labor Costs: Depending on your location and the complexity of the project, labor costs can range from 40% to 60% of the total budget. Hiring experienced professionals ensures a high-quality finish.
    2. Custom Features: Specialty items like custom-built cabinets, intricate tile designs, or unique fixtures can be expensive. These custom features add a personal touch but come with a higher price tag.
    3. Plumbing and Electrical Work: If your bathroom remodel involves moving plumbing or rewiring for new fixtures, this can significantly impact costs. Professionals may charge more for complex installations.
    4. Quality Materials: Choosing high-quality materials, such as premium tiles, natural stone countertops, and luxury fixtures, can contribute to higher overall costs.
    5. Permits and Fees: Obtaining necessary permits and paying fees can also add to the expenses. It’s crucial to factor these into your budget from the beginning.

    What adds the most value to a bathroom?

    Certain bathroom renovations and additions can significantly increase the value of your home. Here are some features that tend to have a positive impact on property value:

    1. Quality Fixtures: Upgrading to high-quality fixtures, such as faucets, showerheads, and toilets, adds a touch of luxury and durability, enhancing the overall value.
    2. Modern Lighting: Good lighting can transform the ambiance of a bathroom. Consider modern, energy-efficient lighting fixtures that provide ample illumination.
    3. Well-Designed Storage: Ample storage space is a valuable asset in any bathroom. Custom-built cabinets or well-designed storage solutions can add functionality and appeal.
    4. Efficient Layout: A well-thought-out layout that maximizes space and flow is attractive to potential buyers. Ensure that the bathroom layout is practical and user-friendly.
    5. Quality Materials: Investing in durable and aesthetically pleasing materials, such as natural stone countertops and quality tiles, can contribute to the perceived value of the space.

    Conclusion

    In whether you’re considering a kitchen renovation or a Bathroom Remodeling, strategic choices, and thoughtful investments can enhance both the functionality and aesthetics of your home. Always weigh the costs against the potential benefits, and remember that quality craftsmanship and attention to detail can make a significant difference in the long run.

    For professional assistance with your kitchen renovation and bathroom remodeling projects, check out Builds More Construction. Their expertise and commitment to quality ensure that your vision for a transformed space becomes a reality.